Nowadays, there are so many options available for digital photo frames. From size to aesthetic to screen resolution to extra multimedia features, there are innumerable features to select from in finding your ideal digital picture frame.
One of the best innovations in digital picture frames is the many different ways that you can transfer photos from your source device to the frame itself. And email picture frames are a great way to do this. Below we lay out everything you need to know about digital picture frames with email upload, and a step-by-step guide for how to email photos to select Aluratek digital frames.
Setting Up a Digital Picture Frame With Email - Step by Step Guide
Use this guide to set up your digital photo frame with email from start to finish. This little known feature allows you and your loved ones to send photos directly from their email.
Step 1 - Make sure you buy a digital frame you can email pictures to
First thing’s first: when you are selecting and purchasing a digital picture frame, make sure it has the capability to receive photos from email. There are many different ways that digital photo frames are able to display photos nowadays, so make sure that email is an included functionality when you are going through the digital photo frame buying process.
Here are some of our recommendations for digital picture frames with email:
AWDMPF107F 7" WiFi Digital Photo Frame with Touchscreen IPS LCD Display and 8GB Built-in Memory
- AWDMPF110F 10" WiFi Digital Photo Frame with Touchscreen IPS LCD Display
- AWDMPF208F 8" WiFi Digital Photo Frame with Touchscreen IPS LCD Display
- AWDMPF8BB 8" WiFi Digital Photo Frame with Touchscreen IPS LCD Display, White
- AWS09F 9" WiFi Touchscreen Digital Photo Frame with Motion Sensor
- AWS10F 10" WiFi Digital Photo Frame with Touchscreen IPS LCD Display
- AFT11F 11.6" WiFi Digital Photo Frame with Live Video Chat and Touchscreen LCD Display
- AWS215F 15" WiFi Touchscreen Digital Photo Frame with Motion Sensor and Auto Rotation
- AWS217F 17" WiFi Touchscreen Digital Photo Frame with Motion Sensor and Auto Rotation
- AWS13F WiFi Touchscreen Digital Photo Frame with 3K Resolution, Light Sensor and 32GB Built-in Memory
- AWS15F 15.6" WiFi Digital Photo Frame with Touchscreen IPS LCD Display
- AWS17F 17.3" WiFi Digital Photo Frame with Touchscreen IPS LCD Display
- AWS19F 19" WiFi Touchscreen Digital Photo Frame with Light Sensor, Auto Rotation and 64GB Built-in Memory
- ACKWS10F 10.1" WiFi Digital Photo Frame with Touchscreen IPS LCD Display and 32GB Built-in Memory
Step 2 - Set up your new digital frame
Once you purchase your Aluratek digital photo frame, you’ll need to go through the recommended setup process. Please remove the plastic film from the frame screen. Next, attach the frame stand to the back of the frame and plug the frame into an AC outlet with the provided power adapter.
Step 3 - Connect your digital picture frame to WiFi
Like most home technology products nowadays, your new digital picture frame needs to be connected to your home WiFi to function. The next step is to connect the frame to your WiFi network, so you can proceed with the email setup.
Step 4 - Download Aluratek Smart Frame App
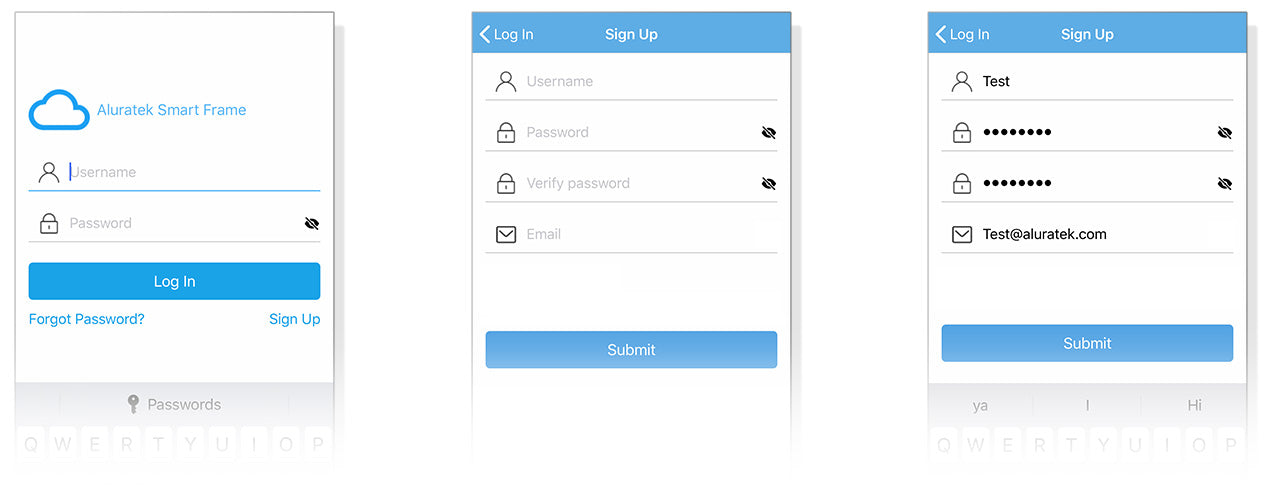
Download the Aluratek Smart Frame App to set up an account and bind to your frame. You’ll need to create a username and password.

Step 5 - Bind Your Frame
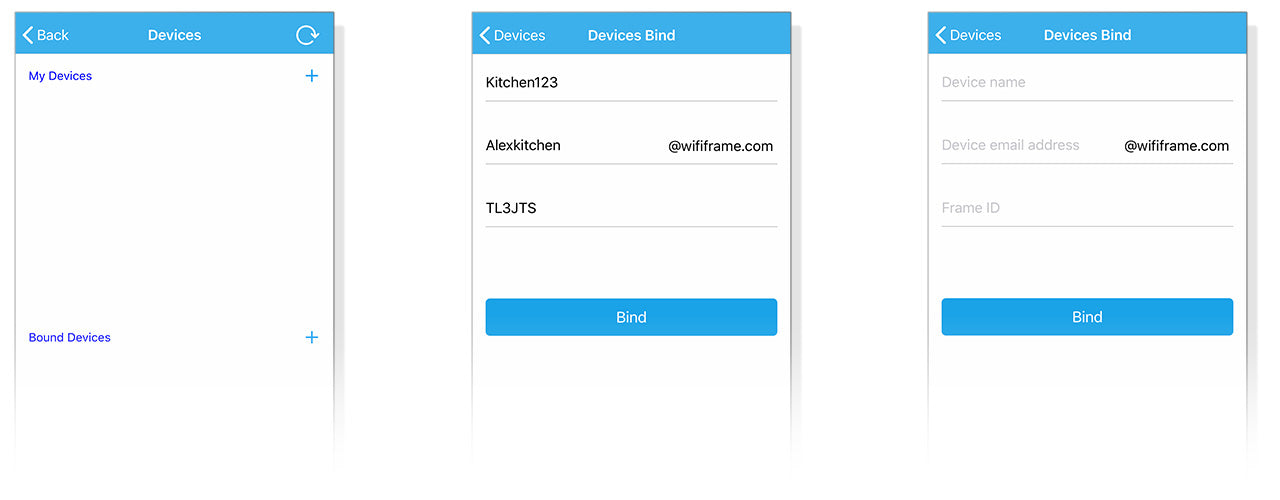
While signed into the Aluratek Smart Frame app, Select “Devices” and press the “+” symbol to add your new frame. Select a name for the frame, and create your frame’s unique email address. The frame ID is also needed, which can be found within the frame under “Settings” and “Device Info”. Once all fields are complete, select “Bind.” Your frame will receive a notification of the request for binding. To accept the request, go to “User Management” in the “Settings” menu of the frame, and “Accept” the “Pending User Request.”

Your digital photo frame should now be set up to receive photos using the Aluratek Smart Frame app, but what if you wanted to email a set of pictures from your computer?
Step 6 - Email Photos To Your Frame
The email address used to sign up during step 4 is already approved to send photos. Simply attach the photos you’d like to send in the email, and send them off, no subject line is needed. The photos will be automatically added to your photo gallery in the frame.
What if your loved ones want to send photos through email? Additional email addresses can also be binded to the frame. To bind other email addresses, the friend or family member needs to send an email with a subject line of “bdxxxxxx” (if your frame id was xxxxxx).
Example using the info from the above images:
To: alexkitchen@wififrame.com
Subject: bdTL3JTS
(No info in the body)
Once the email is sent, the frame will notify you of the user request. Accept the request again by going to “Settings>User Management” and accepting the “Pending User Request.” The new user will receive a confirmation email with the subject line “Your Binding Request Was Complete.” Your loved one will now be able to send photos to your frame! It’s that easy!
Step 7 - Enjoy your photos
After you or your loved ones have emailed photos to your digital picture frame, sit back and enjoy the slideshow of your favorite memories!
Find Your Perfect Digital Picture Frame Today
Now that you have an understanding of the process of how to email photos to digital picture frames (and just how simple it is), you can confidently choose a digital photo frame to display your favorite memories.
At Aluratek, we offer a variety of digital picture frames with unique features and technology, including many frames that offer “upload through email” photo display capability. Find the perfect digital picture frame for your needs and shop all of our Digital Photo Frames here!


Share:
Portable Cell Phone Charger Guide
Top Gifts For Tech Lovers